Blank Electrical Panel Schedule PDF Form
Documents PDF
Blank Electrical Panel Schedule PDF Form
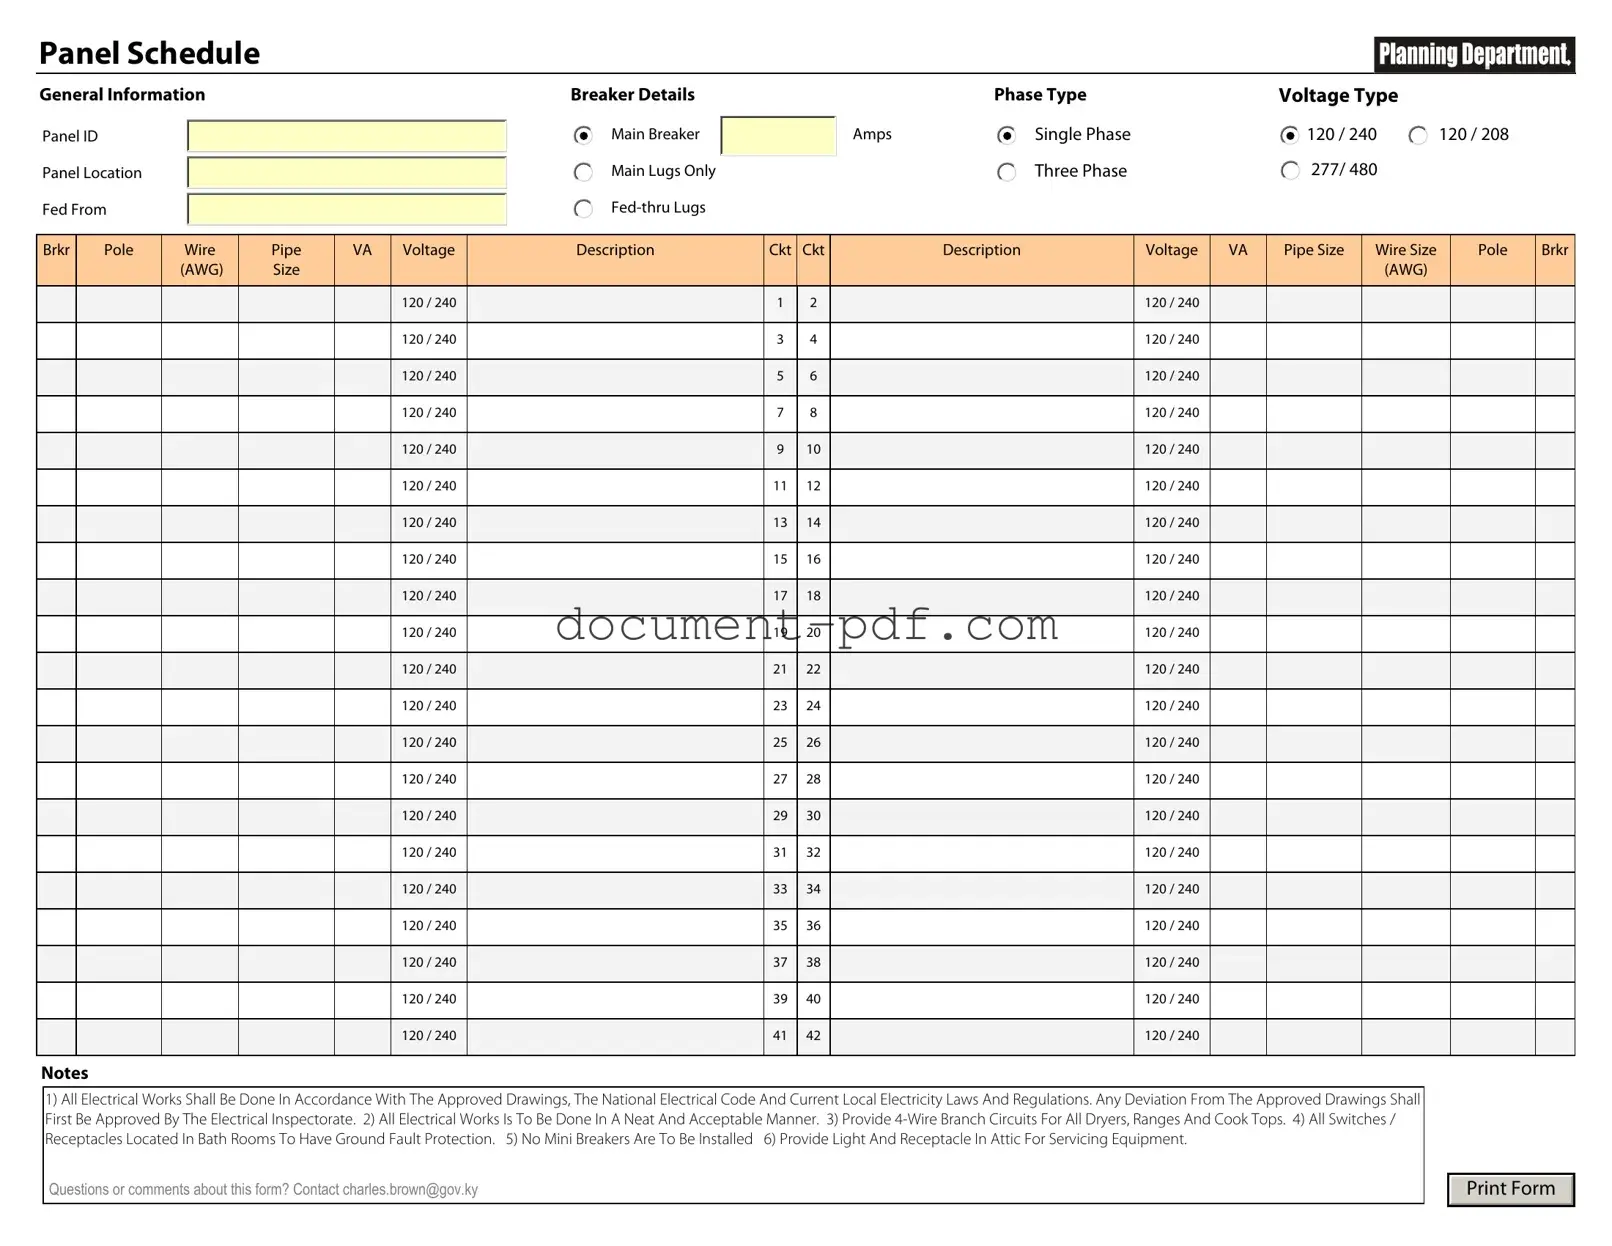
The Electrical Panel Schedule form serves as a critical tool in managing electrical systems within residential, commercial, and industrial settings. It provides a comprehensive overview of the electrical distribution system, detailing circuit assignments, load calculations, and breaker specifications. This form typically includes essential information such as the panel name, location, and the number of circuits, ensuring that users can easily identify and monitor each circuit's function and capacity. Additionally, it outlines the amperage ratings for breakers, which is vital for maintaining safety and compliance with electrical codes. By systematically organizing data related to each circuit, the form aids in troubleshooting, maintenance, and future expansions of the electrical system. Ultimately, the Electrical Panel Schedule form enhances efficiency and safety, facilitating informed decision-making for electricians, engineers, and property owners alike.
Completing the Electrical Panel Schedule form is an essential task that helps ensure the proper organization and management of electrical circuits. By accurately filling out this form, you will provide vital information about each circuit in your electrical panel, which can assist in maintenance and safety checks.
Understanding the Electrical Panel Schedule form is crucial for anyone working with electrical systems. However, several misconceptions can lead to confusion. Here are four common misconceptions:
This is not true. Even small residential properties benefit from having an Electrical Panel Schedule. It helps in tracking circuits and ensuring safety, regardless of the size of the building.
While electricians often fill out the form, homeowners and property managers should also understand it. Knowledge of the schedule can help in managing electrical loads and planning for future upgrades.
This misconception can be misleading. An Electrical Panel Schedule should be updated regularly to reflect changes in the electrical system, such as new circuits or appliances.
Many people believe the form is overly complicated. In reality, it is designed to be straightforward. With a little guidance, anyone can learn to read and interpret the information effectively.
Panel Schedule
General Information
Panel ID
Panel Location
Fed From
Breaker Details
Main Breaker
Main Lugs Only
|
Phase Type |
Voltage Type |
|
Amps |
Single Phase |
120 / 240 |
120 / 208 |
|
Three Phase |
277/ 480 |
120 / 240 |
|
|
|
Brkr |
Pole |
Wire |
Pipe |
VA |
Voltage |
Description |
Ckt |
Ckt |
Description |
Voltage |
VA |
Pipe Size |
Wire Size |
Pole |
Brkr |
|
|
(AWG) |
Size |
|
|
|
|
|
|
|
|
|
(AWG) |
|
|
|
|
|
|
|
|
|
|
|
|
|
|
|
|
|
|
|
|
|
|
|
120 / 240 |
|
1 |
2 |
|
120 / 240 |
|
|
|
|
|
|
|
|
|
|
|
|
|
|
|
|
|
|
|
|
|
|
|
|
|
|
120 / 240 |
|
3 |
4 |
|
120 / 240 |
|
|
|
|
|
|
|
|
|
|
|
|
|
|
|
|
|
|
|
|
|
|
|
|
|
|
120 / 240 |
|
5 |
6 |
|
120 / 240 |
|
|
|
|
|
|
|
|
|
|
|
|
|
|
|
|
|
|
|
|
|
|
|
|
|
|
120 / 240 |
|
7 |
8 |
|
120 / 240 |
|
|
|
|
|
|
|
|
|
|
|
|
|
|
|
|
|
|
|
|
|
|
|
|
|
|
120 / 240 |
|
9 |
10 |
|
120 / 240 |
|
|
|
|
|
|
|
|
|
|
|
|
|
|
|
|
|
|
|
|
|
|
|
|
|
|
120 / 240 |
|
11 |
12 |
|
120 / 240 |
|
|
|
|
|
|
|
|
|
|
|
|
|
|
|
|
|
|
|
|
|
|
|
|
|
|
120 / 240 |
|
13 |
14 |
|
120 / 240 |
|
|
|
|
|
|
|
|
|
|
|
|
|
|
|
|
|
|
|
|
|
|
|
|
|
|
120 / 240 |
|
15 |
16 |
|
120 / 240 |
|
|
|
|
|
|
|
|
|
|
|
|
|
|
|
|
|
|
|
|
|
|
|
|
|
|
120 / 240 |
|
17 |
18 |
|
120 / 240 |
|
|
|
|
|
|
|
|
|
|
|
|
|
|
|
|
|
|
|
|
|
|
|
|
|
|
120 / 240 |
|
19 |
20 |
|
120 / 240 |
|
|
|
|
|
|
|
|
|
|
|
|
|
|
|
|
|
|
|
|
|
|
|
|
|
|
120 / 240 |
|
21 |
22 |
|
120 / 240 |
|
|
|
|
|
|
|
|
|
|
|
|
|
|
|
|
|
|
|
|
|
|
|
|
|
|
120 / 240 |
|
23 |
24 |
|
120 / 240 |
|
|
|
|
|
|
|
|
|
|
|
|
|
|
|
|
|
|
|
|
|
|
|
|
|
|
120 / 240 |
|
25 |
26 |
|
120 / 240 |
|
|
|
|
|
|
|
|
|
|
|
|
|
|
|
|
|
|
|
|
|
|
|
|
|
|
120 / 240 |
|
27 |
28 |
|
120 / 240 |
|
|
|
|
|
|
|
|
|
|
|
|
|
|
|
|
|
|
|
|
|
|
|
|
|
|
120 / 240 |
|
29 |
30 |
|
120 / 240 |
|
|
|
|
|
|
|
|
|
|
|
|
|
|
|
|
|
|
|
|
|
|
|
|
|
|
120 / 240 |
|
31 |
32 |
|
120 / 240 |
|
|
|
|
|
|
|
|
|
|
|
|
|
|
|
|
|
|
|
|
|
|
|
|
|
|
120 / 240 |
|
33 |
34 |
|
120 / 240 |
|
|
|
|
|
|
|
|
|
|
|
|
|
|
|
|
|
|
|
|
|
|
|
|
|
|
120 / 240 |
|
35 |
36 |
|
120 / 240 |
|
|
|
|
|
|
|
|
|
|
|
|
|
|
|
|
|
|
|
|
|
|
|
|
|
|
120 / 240 |
|
37 |
38 |
|
120 / 240 |
|
|
|
|
|
|
|
|
|
|
|
|
|
|
|
|
|
|
|
|
|
|
|
|
|
|
120 / 240 |
|
39 |
40 |
|
120 / 240 |
|
|
|
|
|
|
|
|
|
|
|
|
|
|
|
|
|
|
|
|
|
|
|
|
|
|
120 / 240 |
|
41 |
42 |
|
120 / 240 |
|
|
|
|
|
|
|
|
|
|
|
|
|
|
|
|
|
|
|
|
|
Notes
1)All Electrical Works Shall Be Done In Accordance With The Approved Drawings, The National Electrical Code And Current Local Electricity Laws And Regulations. Any Deviation From The Approved Drawings Shall First Be Approved By The Electrical Inspectorate. 2) All Electrical Works Is To Be Done In A Neat And Acceptable Manner. 3) Provide
Receptacles Located In Bath Rooms To Have Ground Fault Protection. 5) No Mini Breakers Are To Be Installed 6) Provide Light And Receptacle In Attic For Servicing Equipment.
Questions or comments about this form? Contact charles.brown@gov.ky
Print Form
Filling out and using the Electrical Panel Schedule form is crucial for maintaining safety and efficiency in electrical systems. Here are key takeaways to consider:
Affirmative Asylum - The I-589 form is used by individuals seeking asylum in the United States.
Completing the NYCERS F266 form is an essential step for members in Tier 3 and Tier 4 of the New York City Employees' Retirement System, as it initiates the process to receive their Vested Retirement Benefit. As part of this process, it is also important for members to familiarize themselves with the necessary requirements and conditions outlined on resources like New York PDF Docs, ensuring they make informed decisions regarding their benefits and select an appropriate beneficiary for any potential death benefits.
Owner Operator Lease Agreement - The parties must adhere to the stipulated procedures to avoid legal complications.
Free Insurance Card Template - Check for the company policy number on this card.
When filling out the Electrical Panel Schedule form, it is essential to adhere to certain guidelines to ensure accuracy and compliance. Below is a list of things you should and shouldn't do during this process.
The Electrical Load Calculation form is similar to the Electrical Panel Schedule in that both documents help assess the electrical needs of a building. The Load Calculation outlines the expected electrical load for various circuits, while the Panel Schedule details how those loads are distributed across different breakers. Both documents work together to ensure that the electrical system can handle the anticipated demand without overloading any individual component.
The Circuit Directory serves a similar purpose to the Electrical Panel Schedule by providing a clear overview of how circuits are organized within an electrical panel. It lists each circuit and its corresponding breaker, helping electricians and inspectors quickly identify which circuits serve specific areas or appliances. This document is essential for troubleshooting and maintenance, just like the Panel Schedule.
Understanding the legal process of eviction is vital for landlords, and utilizing the right templates can simplify this procedure. For example, landlords seeking to terminate a rental agreement may find the https://texasformsonline.com/free-notice-to-quit-template particularly helpful as it provides a clear guideline on how to issue a Notice to Quit, ensuring compliance with Texas rental laws and aiding in the effective communication of eviction intentions to tenants.
The Wiring Diagram is also comparable to the Electrical Panel Schedule. This diagram visually represents how electrical components are connected within a system. While the Panel Schedule lists the circuits and their loads, the Wiring Diagram shows the physical layout and connections. Both documents are crucial for understanding and managing the electrical system effectively.
Lastly, the Load Balancing Report shares similarities with the Electrical Panel Schedule. This report analyzes the distribution of electrical loads across different phases in a three-phase system. It ensures that loads are balanced to prevent overheating and inefficiencies. The Panel Schedule provides the necessary details about each circuit, making it easier to create an accurate Load Balancing Report.